Estimated reading time: mins

Deviation analysis (nominal actual comparison)

What is a Nominal Actual Comparison Report? (Deviation Analysis) 04:49
We perform a deviation analysis in metrology to compare two 3D models with each other and to document the differences with a false color comparison. The analysis is mainly used in quality assurance to document reverse engineering deviations from the original 3D scan. If we compare the CAD data (nominal state) of a part with the 3D scan (actual state) of the same part, this is called a “nominal actual comparison”.
Table of Contents

Example 1: Deviation Analysis for Quality Control in Production

If a company manufactures metal gears, every day, the factory produces 1000s of gears. Six gears
are taken at random from the production line, and then 3D-scanned. From the time the gear is
initially designed, there is a CAD model. The CAD model is a 3D file with all dimensions of a perfect
gear. This CAD model is compared with the 3D scans from the production line. This is a “nominal
actual comparison”. It is a deviation analysis that shows how much the gears from production
deviate from a perfect gear. Based on this analysis, the engineers can optimize the gear production
machine to improve manufacturing quality.
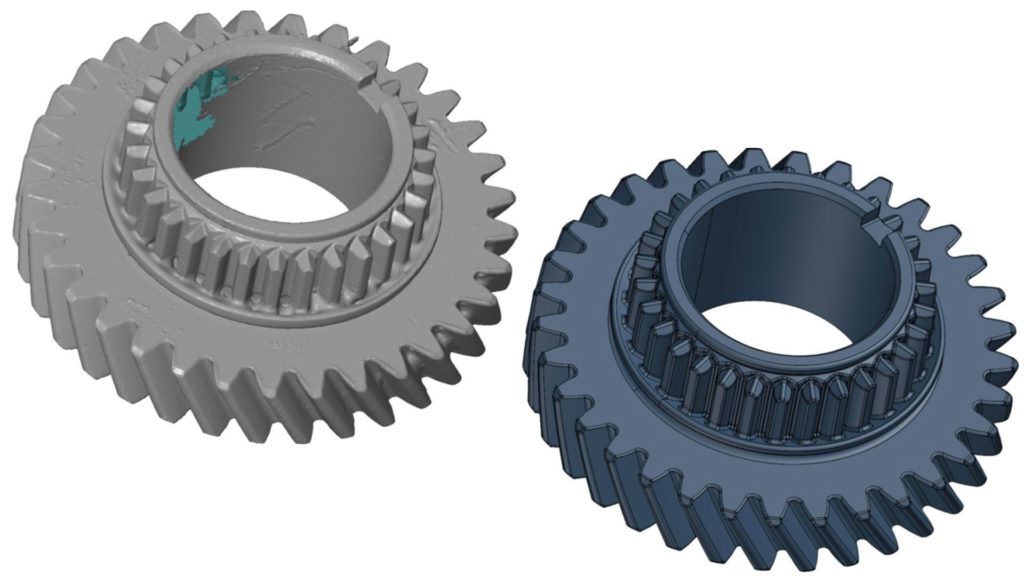
Two gear 3D models—on the left is a 3D scan and on the right is a CAD model
Swann Rack / Holocreators Gear 3D Scan (left) and gear reverse engineering with solid modeling (right)

Example 2: Deviation Analysis for Quality Control in Reverse Engineering

A part is first 3D-scanned, then a reverse-engineered model is created from this 3d scan. However,
the reverse engineering process can only approximate the 3D scan. The differences between the 3D
scan and the reverse engineering are then analyzed and visualized with a deviation analysis and a
false color comparison.

Deviation analysis comparing the 3D scan of a gear with the original CAD model front-view
Swann Rack / Holocreators Front view of a gear; deviation analysis of 3D Scan and CAD model

Deviation Analysis in Four Steps

  1. Import of the nominal data (e.g., CAD file of the perfect gear).
  2. Import of the actual data (e.g., 3D scan of the manufactured gear).
  3. Both data sets are superimposed in the analysis software (GOM Inspect)
  4. The data sets are compared, and a deviation analysis report is created. The differences are
  5. visualized with a false color comparison.
Deviation analysis comparing the 3D scan of a gear with the original CAD model side-view
Swann Rack / Holocreators Side view of a gear; deviation analysis of 3D Scan and CAD model

Deviation Analysis Report

Two 3D models are superimposed using the analysis software “GOM Inspect”. The differences
between the two data sets are displayed in color. Different colors correspond to positive and
negative deviations. On the right side of the report, there is a legend showing a color gradient. Red
means that the actual data is above the nominal data. Blue means that the actual data is below the
nominal data.

Free software GOM Inspect for creating a deviation analysis or nominal actual comparison report

The best and free software to create a deviation analysis or nominal actual comparison report is
GOM inspect. GOM is a company that builds predominantly 3D Scanners but also makes great
software.

Do you require a deviation analysis with your reverse engineering project?

Holocreators offers professional 3D-scanning and reverse engineering services. For quality
assurance, and so that the customer can check how far our reverse engineering deviates from the
original 3D scan, we always deliver a deviation analysis. We would be happy to assist you with your
project. Please call us at +49 40 481133 or send an email info@holocreators.com
Swann has been enthusiastic about everything 3D for many years. His roots lie in analog holography, which brought him to digital 3D-modeling in 2011.

The rapid progress of various 3D-scanning techniques fascinated himso much thathe founded Holocreators together with his brother Miro Rack in 2015.

Ready to get started?
  • JPG, PDF, or PNG max 100 MB
    Drop files here or
    Accepted file types: jpg, png, pdf, jpeg, Max. file size: 100 MB.
    You may be interested
    Estimated reading time: mins
    With the help of specialized 3D scanners, you can 3D-scan people and animals. This allows you to create 3D models that can be 3D-printed or used for 3D animation. We'll show you three different devices that make such 3D scans possible.
    Estimated reading time: mins
    Kitbashing is associated with model making. It is composed of the words "Kit" and "Bashing". “Kit” refers to "model kit". So, when a model maker is "kitbashing", he blends parts from different model kits. Similar to a collage. The model maker combines several individual models into an entirely new model.
    Estimated reading time: mins
    A NURBS model consists of points connected by curves. A polygon mesh consists of thousands or millions of small triangles. CAD surface models are usually created using NURBS surfaces, while 3D scans are typically exported as a polygon mesh. The conversion from a polygon mesh to a NURBS model is called "reverse engineering".
    Estimated reading time: mins
    Reverse engineering enables us to create a copy of an object. For this purpose, the part is 3Dscanned, then the 3D scan data is converted into a CAD format, and finally, the part is manufactured. All these steps result in noticeable deviations. If an error adds up over multiple steps, then we call this error propagation.

    Thanks you!

    Our representative will be in touch with you soon

    Thanks you!

    We are glad that you have subscribed to our newsletter
    sparks